Materials Needed:
- 2 Strobes
- Shoot Thru Umbrella
- Big Octagonal Softbox
- Tall Black Gobo (deflector)
- Round Silver Reflector
- Big Octagonal Softbox
Step 1: Finding Perfect Model
It took a long time, before we found right model.
We needed someone very soft and friendly on the face, with cheeky smile that will bring an under layer to the shoot.
We needed someone very soft and friendly on the face, with cheeky smile that will bring an under layer to the shoot.
Step 2: Setting Key Light
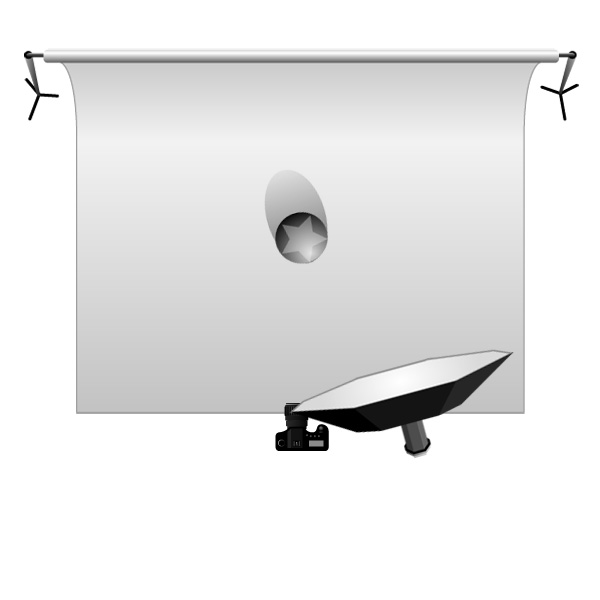
I wanted to create a natural feel to the photographs. I decided to use an Octagonal Softbox as main light source, on tcamera right. Setting it up close to model will give very nice soft light wrapping around her face. This is similar to light you might get from the sun shining through light clouds.
Following idea of keeping light natural, the main source will have to be placed just above our models head, and pointed a little bit down. Keep an eye on the shadow under her nose and chin, they can’t be too long.
Step 3: Background Light
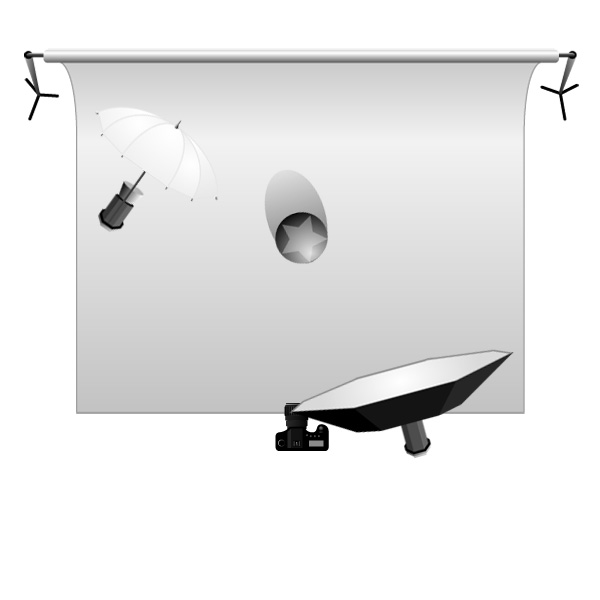
After setting my main light, I thought that the background (even though it is white) came out in my test shot too dark. Also, the model was casting a shadow which I didn’t want.
I needed additional light in the back. A Shoot Thru umbrella was the perfect solution: it gives nice, soft light, with quite an obvious hot spot. I placed it on the left of the camera.
As a White Shoot Thru umbrella is a type of light modifier that has very broad range of emitted light, it will also brighten up a whole scene a little bit. We will take care of this extra light in the next step.
Carefull!
White Shoot Thru Umbrella’s used in the way described above will spill on the model, creating unwanted shine on the side of the subject.
Step 4: Deflector, Reflector and Flag.
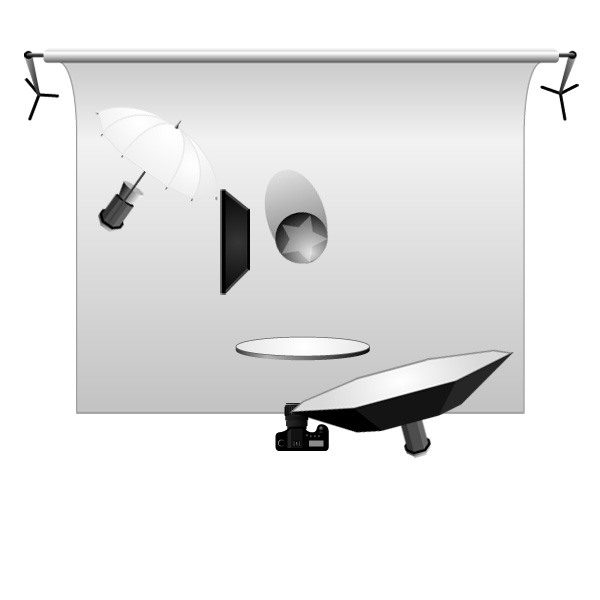
First of all we have to get rid of light spilling on our model from Background Light. To do this, I used Black Gobo (a kind of flag used to block light) as a Flag and at the same time it helped me to deepen the shadow on the models left side. Creating nice contrast between the well lit background and the model’s left side, I gain more focus on the clothes she is wearing.
Everything seemed to be ready for shooting. But shadows created by my key light, under the chin and nose, were a bit too dark.
A Silver Reflector was the perfect solution. Placed just under the camera, flat on the floor, the reflector bounced light coming from the key light and filled unwanted shadows with soft light.
Step 5: Camera Settings
The white balance was set to flash, I find it easier than adjusting in Adobe Camera Raw. I used ISO 100 to get away from any possible noise, and thanks to f16 I could be sure that everything will be sharp in the shot (this is very important in fashion photography). Exposure time was 1/125.
Tidak ada komentar:
Posting Komentar